

Almost every hacked WordPress site I get called about was compromised the same dull way: an out of date plugin with a public vulnerability, or a weak password on an administrator account. Not a clever exploit, not a targeted attack. An automated bot scanning millions of sites for a known hole and finding one.
That matters because most security advice online is sorted by what is easy to write about rather than by what stops attacks. Changing your database table prefix gets a whole section. Keeping plugins updated gets one line.
This checklist is ordered by effect. The first four items prevent the overwhelming majority of real compromises, and all four are done inside the WordPress dashboard with no code at all. Everything after is genuine defence in depth, and does involve editing server files. I have flagged the couple of items that are mostly ritual. If you have half an hour rather than an afternoon, do Steps 1 to 4 and Step 11 and stop.
Before you start
You need an administrator login. From Step 5 onwards you also need SFTP (a way of connecting to your server’s files with a program such as FileZilla) or your hosting panel’s File Manager, which runs in the browser and is easier if SFTP is new to you. Some of those steps edit files that will take the site offline if you get them wrong.
Take a full backup first, files and database, and download it somewhere that is not the same server. Then keep a copy of each file before you edit it. If you break wp-config.php you get a white screen and no dashboard, and the fastest way back is putting the old file in place: seconds if you have it, a support ticket if you do not.
If you already suspect the site is compromised, stop. Hardening an infected site just locks the attacker in with their backdoor still in place. Clean it first, which is a different job.
Step 1: Keep core, plugins and themes updated
This is the whole game. When a flaw is found in a plugin it is published in a public database, in enough detail to write an attack against, and bots start scanning for sites still on the old version within hours. The update closes the hole.
Leave automatic updates on for WordPress core minor releases, which is the default. Then decide plugin by plugin, using the Auto-updates column on the Plugins screen. Automatic plugin updates are fine for well maintained plugins on simple sites, and risky on a shop or a heavily customised build, where an update can break checkout at 2am with nobody watching. The realistic middle ground is automatic updates on a staging copy (a duplicate nobody visits, which many hosts create at the press of a button), or manual updates on a schedule with a backup taken first.
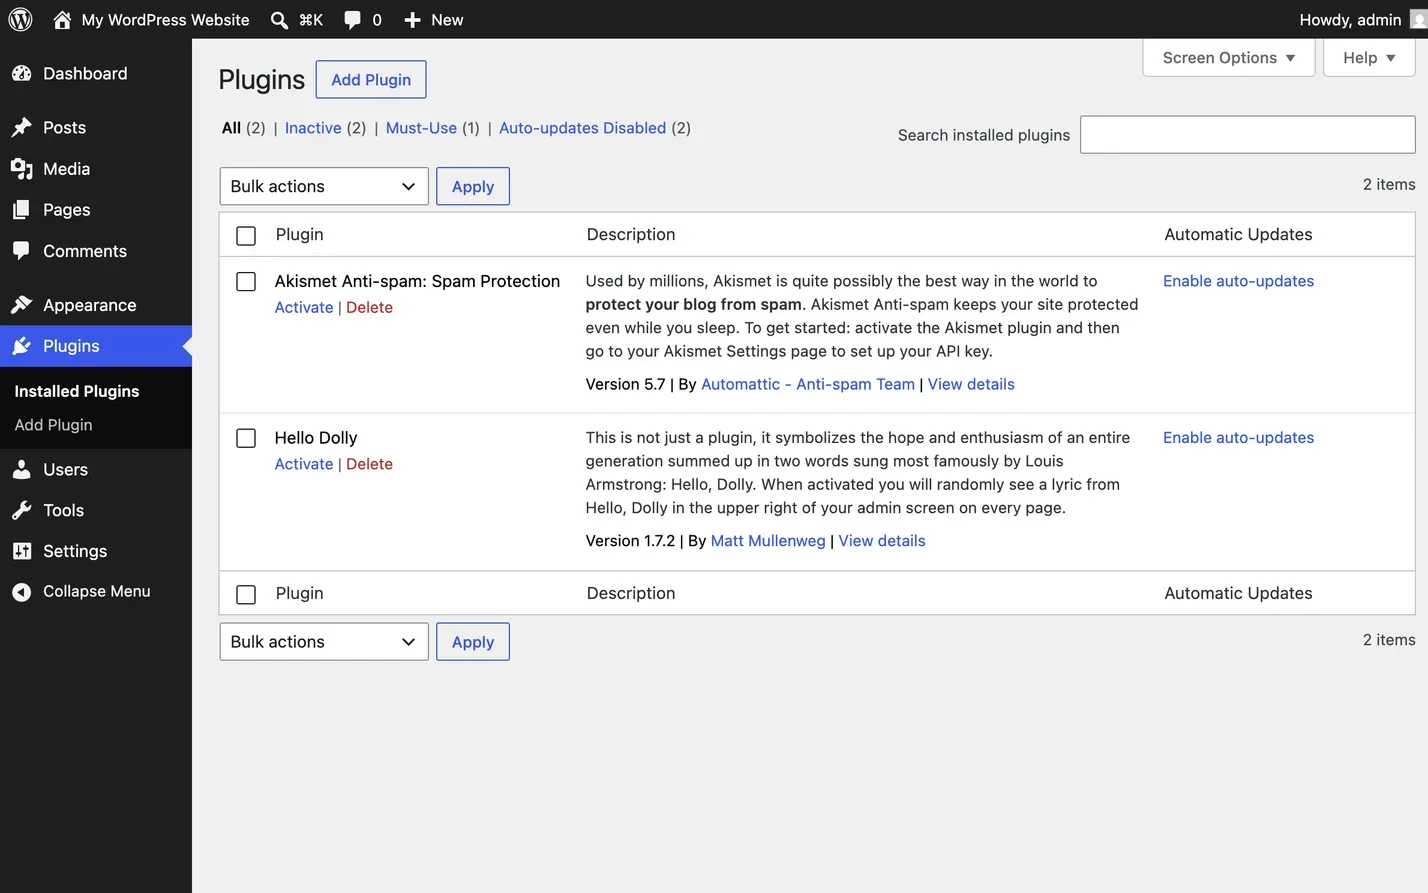
The bigger risk is abandoned plugins. A plugin untouched for two years is not stable, it is unmaintained, and when somebody finds a flaw in it nobody will fix it. Check the “last updated” date and the tested-up-to version on the WordPress.org listing for everything you run, and replace anything more than a year stale.
Delete what you are not using, with the Delete link on the Plugins screen. A deactivated plugin still has all its files on the server, and some flaws can be exploited by requesting one of those files directly in a browser, whether the plugin is switched on or not. Deactivating is not removing.
Doing this every month, for a site you also have to run a business through, is the sort of thing people intend to do and then do not, which is why I offer maintenance plans covering it.
Step 2: Fix passwords and add two-factor
Every administrator account needs a long, unique, random password stored in a password manager. Not a memorable phrase with a number on the end. Reused passwords are the second big cause of compromise, because credentials leaked from an unrelated breach get replayed against thousands of WordPress logins.
Then add two-factor authentication, or 2FA, to every account that can install plugins or edit files. Logging in then needs a second thing on top of the password, normally a six digit code from an app on your phone. WordPress does not do this out of the box, so add it with a plugin: the Two Factor feature plugin on wordpress.org, or most security plugins. This is the highest value addition after updates, because it makes a stolen password useless on its own. An authenticator app is best, and SMS is weaker but far better than nothing.
If there are admin accounts belonging to a developer you stopped working with years ago, delete them. Old accounts with old passwords and no owner are pure risk.
Step 3: Limit login attempts
Without a limit, a bot can try passwords against /wp-login.php forever, thousands per hour, until one works. That is called brute forcing. Rate limiting blocks an address after a handful of failures, which turns brute forcing from viable into pointless, and it cuts the server load those attacks generate. On shared hosting a site slowing to a crawl is often the first symptom anyone notices.
Most security plugins include this, and many hosts do it further out, stopping the request before it reaches your site at all, which is better and costs you nothing. Check before adding a plugin to duplicate it.
Renaming the login URL is often bundled in as a security feature. It reduces automated noise in your logs, which is pleasant, but it is obscurity rather than security. Do it if you like a quiet log, not instead of rate limiting.
Step 4: Apply least privilege to user roles
Least privilege is a principle rather than a setting: give everyone the lowest role that still lets them do their job. A client who writes blog posts is an Author or an Editor, not an Administrator.
This matters because the roles that can install plugins or edit theme files can, in effect, run any code they like on your server. Cutting five admins down to one admin and four editors removes four ways in. Phish one of those four now and the attacker gets someone who can write posts, not someone who can install a backdoor.
Audit rather than assume. Under Users, filter by Administrator and look at what comes back. Most sites I open have more admins than anyone expected, usually including a plugin vendor’s support account and someone who left.
Step 5: Set correct file permissions
The server side of the list starts here. Every file carries a permission setting deciding who may read it, write to it, or run it, written as three digits: owner, group, everybody else. Too loose, and an attacker who gets a foothold anywhere can modify anything. Too tight, and WordPress cannot update itself.
The standard numbers are 755 for folders and 644 for files.
| What | Set it to | Why |
|---|---|---|
| Folders | 755 | You can write into them, everyone else can only look inside |
| Files | 644 | The server can read them, only you can change them |
wp-config.php | 640, then test | Takes read access away from other accounts on the server |
| Anything at all | never 777 | Any other account on that server can rewrite the file |
Most File Managers and FTP programs set these by right-clicking and choosing Permissions. With SSH, these apply them across the whole site at once:
# Directories: owner read/write/execute, others read/execute only.
find /path/to/site -type d -exec chmod 755 {} \;

# Files: owner read/write, others read only.
find /path/to/site -type f -exec chmod 644 {} \;

# wp-config.php holds your database credentials, so it is worth tightening.
# 640 removes read access for everyone outside the file's own group. Whether
# PHP can still read it depends on how your host runs PHP, so test the site
# straight after and use the revert below if it goes down.
chmod 640 /path/to/site/wp-config.php

# Revert if the site goes blank or starts returning a 500 error:
chmod 644 /path/to/site/wp-config.php
That 640 is the one line here that can take a site down, so load the homepage the moment you run it. On hosts where PHP runs as your own account it is fine. On setups where PHP runs as a separate web server user that is not in your group, PHP can no longer read the file, so it cannot load it at all and every page turns into a white screen or a 500 error, with a “failed to open stream: Permission denied” line in your error log. Setting it back to 644 fixes it instantly, and either number keeps the file out of a visitor’s hands, because a working server hands .php files to PHP to execute rather than printing them.
Never use 777 on anything. It means everybody can read, write and run it, so any other user on that server can rewrite your files, and on shared hosting you do not know who else is there. If a plugin tells you to set 777 to make uploads work, the real problem is file ownership, and the answer is a support ticket.
Ownership matters as much as the numbers. Every file also belongs to a user account on the server, and yours should belong to the account your website runs as. If a permissions change breaks uploads or updates, wrong ownership is nearly always why, and that is one for your host too.
Step 6: Disable the built in file editor
WordPress ships with an editor under Appearance and Plugins that lets an administrator edit PHP files straight from the browser. Anyone who gets into an admin account can therefore write their own code onto your server without needing any file access at all. It is the first thing an attacker reaches for.
Add this to wp-config.php, which sits in the site root, the top-level folder alongside wp-admin and wp-content and usually called public_html. Save a copy first, then put the line above the comment near the bottom reading “That’s all, stop editing”, because anything below it is ignored:
// Removes Appearance > Theme File Editor and Plugins > Plugin File Editor.
// An attacker with a stolen admin login can no longer write PHP from the browser.
define( 'DISALLOW_FILE_EDIT', true );
The trade off is losing a convenient way to make quick edits. That is the point. Use SFTP instead.
A stronger version, DISALLOW_FILE_MODS, also blocks installing and updating plugins and themes from the dashboard, your own update buttons included. Excellent on sites whose code is deployed from a repository, painful where an owner installs their own plugins, so choose deliberately.
Step 7: Protect wp-config.php
wp-config.php contains your database username, password and security keys. Anyone who reads it owns the site.
Moving it one folder above the web root is a well known trick, and WordPress looks there automatically. The web root is the folder the public can reach through a browser, so anything above it has no URL at all. It helps if a server misconfiguration ever causes PHP files to be handed out as readable text. Not the strongest step here, but cheap.
Blocking direct requests is worth doing regardless. Apache and nginx are the two web servers nearly every host runs, and only Apache reads .htaccess. On Apache, add this to .htaccess in your site root, creating the file if there is none. The leading dot makes it hidden, so your File Manager may need “show hidden files” turned on:
# Deny direct HTTP requests to wp-config.php.
<Files wp-config.php>
    Require all denied
</Files>
Then check your security keys, the long random strings partway down wp-config.php that WordPress uses to sign the cookies keeping you logged in. If yours still say “put your unique phrase here”, they were never set. Generate real ones from the WordPress secret key service and paste them over the old block. That logs everyone out, since the old cookies no longer check out, which is exactly what you want after any suspected compromise. No data is lost.
Step 8: Turn off PHP execution in uploads
Your uploads folder, at wp-content/uploads, should only ever hold media. If an attacker sneaks a PHP file in there through a vulnerable upload form, that file on its own is harmless. What turns it into a compromised site is the server agreeing to run it when they visit its URL. This step tells the server not to.
On Apache, create wp-content/uploads/.htaccess:
# Refuse any direct request for a PHP file here. Media is untouched.
<Files *.php>
    Require all denied
</Files>
On nginx, .htaccess is ignored entirely and silently, so the equivalent goes into nginx’s own configuration instead. On managed hosting only your host can make that change, so send them this and ask:
# Return 403 rather than handing .php files in uploads to PHP-FPM. It has
# to sit above the block that passes .php to PHP-FPM, because nginx uses
# the first matching regex location and ignores the rest.
location ~* /wp-content/uploads/.*\.php$ {
    deny all;
}
Test an existing image URL afterwards. If images break, the rule is too broad and you have blocked more than PHP.
Step 9: XML-RPC and the REST API
xmlrpc.php is an old file in your site root that lets outside software talk to WordPress, from before the modern equivalent existed. One of its features still lets an attacker try hundreds of passwords in a single request, slipping past rate limiting that counts requests, and it can be abused to help flood other sites with traffic.
If nothing you use needs it, block it. Jetpack and some older mobile apps do, so check first:
# Block XML-RPC entirely. Remove this if Jetpack or a remote publishing
# tool stops working, since both rely on it.
<Files xmlrpc.php>
    Require all denied
</Files>
Do not confuse this with the REST API, the modern replacement, which is very much in use. Blocking that outright breaks the block editor and a great deal of plugin functionality. If your worry is that anyone can list your usernames at /wp-json/wp/v2/users, restrict that one address rather than the whole API. Most security plugins have a tick box for it.
Step 10: HTTPS and security headers
Serve everything over HTTPS, the encrypted version of a web connection, shown by the padlock in the address bar. Certificates are free through Let’s Encrypt and most hosts set one up automatically. Without it, passwords travel across the network as readable text.
Then add response headers, the short instructions a server attaches to every page telling the browser how to treat it. These do not stop a break in. They limit what an attack can do to visitors once something is injected. The <IfModule> wrapper makes Apache skip the block quietly if it cannot handle it, rather than returning a 500 error:
<IfModule mod_headers.c>
    # Stop your pages being framed by another site (clickjacking).
    Header always set X-Frame-Options "SAMEORIGIN"
    # Stop browsers guessing a file's type and executing it as script.
    Header always set X-Content-Type-Options "nosniff"
    # Limit how much URL information leaks to sites you link out to.
    Header always set Referrer-Policy "strict-origin-when-cross-origin"
    # Force HTTPS for a year. Add this last, and only once HTTPS works on the
    # main domain AND on every subdomain, because includeSubDomains covers all
    # of them. Drop includeSubDomains if you are not certain.
    Header always set Strict-Transport-Security "max-age=31536000; includeSubDomains"
</IfModule>
One is missing on purpose. Content-Security-Policy, which lists exactly where a page may load scripts from, is the strongest header available and the most likely to break a WordPress site, since themes and plugins scatter inline scripts everywhere. Introduce it in report-only mode first, where the browser tells you what it would have blocked without blocking anything.
Step 11: Back up properly, because this is what saves you
Everything above reduces the chance of a compromise. Backups determine how bad it is when one happens anyway.
A backup living only on the same server as the site is not a backup, because if that server is compromised or fails it goes with everything else. Send copies somewhere separate, with its own credentials.
Keep enough history. Quiet compromises go unnoticed for weeks, so if you keep one nightly backup and overwrite it every day, the only copy you have may already contain the attacker’s files. Daily for a fortnight plus weekly for a couple of months is a reasonable shape. Then test a restore, because an untested backup is a hope rather than a plan.
About table prefixes and other theatre
Changing the database table prefix from wp_ is on every checklist. Tables are the drawers inside the database, and by default they all start wp_. It was meant to frustrate attacks that inject database commands with table names written in, and in practice it does very little, because such an attack can simply ask the database what its tables are called. Changing it on a live site means rewriting serialised data, a packed format WordPress uses for settings that records the length of every piece of text inside it. Edit one without adjusting those counts and the value becomes unreadable, which is why a botched change breaks the site outright.
Use a different prefix when installing a new site, since that costs nothing. Changing an existing one is not a good use of a risky afternoon.
Two others in the same category. Hiding your WordPress version stops nothing, because the attack is fired at every site regardless of version. Blocking author archives to obscure usernames is worth about five minutes of an attacker’s time. Neither is harmful, but neither belongs above two-factor.
How to check it worked
Go to Tools, Site Health. It reports on HTTPS, PHP version, background updates and inactive plugins and themes, in plain language.
Then check by hand. Visit https://yoursite.com/wp-config.php and confirm you get “403 Forbidden” or a blank page rather than file contents. Confirm Appearance no longer offers Theme File Editor. Log out and back in to confirm two-factor prompts, then type a few wrong passwords deliberately and confirm you get locked out. Finally, run the site through a free online header checker, since a typo in .htaccess can silently do nothing.
When it does not work
White screen after editing wp-config.php
Almost always a missing semicolon, a stray space or blank line before the opening <?php, or the new line placed below the “stop editing” comment where WordPress never reads it. Put your saved copy back first, which restores the site immediately, then re-add the line carefully.
Updates or media uploads stopped working
You have tightened permissions or ownership too far and the web server can no longer write to wp-content. Confirm directories are 755, files 644, and ownership matches the user PHP runs as. Do not reach for 777.
Jetpack or a mobile app broke
You blocked XML-RPC and something depends on it. Remove the block and rate limit xmlrpc.php instead.
500 error straight after adding headers
The Apache component that handles headers, mod_headers, is not enabled, or the syntax is slightly wrong. Wrapping the block in <IfModule mod_headers.c> as shown avoids the first case. Remove the block to bring the site back and confirm the cause, then reintroduce one header at a time.
The site is behaving strangely and you are not sure why
Signs of compromise: unfamiliar admin users, posts you did not write, search results showing products you do not sell, redirects that only fire on mobile or only for visitors arriving from Google, sudden outbound spam, unexplained recent modification dates, and .php files inside wp-content/uploads. Any of those means cleanup first and hardening second, which is one of the more common reasons people ask me about fixing a hacked site. If that is where you are now, what to do in the first hour is the order I would work in.
Common questions
Do I need a security plugin?
A good one is useful for login rate limiting, file change monitoring and alerts. It is not a substitute for any of the first four steps. Running three at once is worse than running one, because they conflict and the noise trains you to ignore warnings.
Is WordPress inherently insecure?
No. Core is reviewed heavily and patched quickly. The risk sits in the plugin and theme ecosystem, where quality varies enormously, and in how sites are administered. Running fewer, better maintained plugins is most of the answer.
My host says they handle security. Is that enough?
Hosts secure the server: the operating system, PHP, the network. They cannot keep your plugins updated, choose your passwords, or stop you granting admin to the wrong person. That is where compromises actually start.
How often should I review all this?
Updates weekly or fortnightly, and a full pass over users, plugin health and a test restore every few months. Put it in a calendar, because security work fails quietly and you will not notice you stopped.
What to do this week
If you only do three things, do these. Update everything and remove any plugin untouched in a year. Put two-factor on every administrator account. Get backups running somewhere other than your web server, and restore one to prove it works. That combination handles the ordinary ways WordPress sites get taken.
The rest is worth working through and most of it is a single afternoon. Just do not let the interesting parts, the headers and the .htaccess rules, distract you from the boring parts that do the work.
If staying on top of updates and backups is not realistically going to happen, that is what a maintenance plan is for. And if you are reading this because something has already gone wrong, get in touch rather than hardening on top of an active infection.